I shared this
Glitter Button Ornament
tutorial last week at Sunny Vanilla for Jen's Homemade for the Holidays
series.
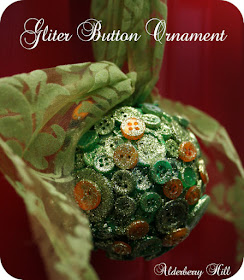
Here's the finished ornament and below I'll tell you how easy it is to create.
I started with a styrofoam ball, pick any size you like.
I got out my button stash and picked out mostly green buttons and a few yellow. Again choose colors to your preference, I bet a multi colored ornament would be fantastic as well.
All you do is start hot gluing the buttons to the styrofoam ball, overlap where necessary for a layered effect. I added the yellow buttons last, I thought a little contrasting color looked nice.
Once I had the ball covered I added a really wide ribbon for the hanger and also glitterfied (made up word) it! I painted a light coat of Mod Podge over the buttons and then sprinkled the glitter on. Glitter makes everything better!
Now you're done! Easy, right?
Imagine, Improvise & Invent,
Sarah


What a cute ornament! I know two kids who would love to make something along these lines. Thanks for the inspiration!
ReplyDeleteTotally darling and timeless! Come find out about the man who fed us all!
ReplyDeleteThat is so pretty! I love this idea and I'm sure this is something that my kids would enjoy too.
ReplyDeleteBest wishes,
Natasha.
Looks great! I would love for you to stop by and link up your ornaments to my ornament linky party!
ReplyDeletehttp://singingthreelittlebirds.blogspot.com/2011/11/25-days-of-christmas-ornaments-linky.html
Oooh, fun! I comPLEtely agree, glitter makes everything better! This would be a fun kiddo project too, and a great use for leftover buttons. Great idea. Would you share here?
ReplyDeletehttp://oneartmama.blogspot.com/2011/11/shine-on-fridays-3-and-some-fabulous.html
Absolutely AMAZING! I love this! You should link this up to the Chirstmas Carnival I now have going on with Hoemmade in December. Thiese are great!
ReplyDeleteSo cute and creative, and you're right the glitter adds an extra "punch". I'm a new follower, Please drop by when you have a sec.
ReplyDeletethanks for linking this to our Christmas blog hop! I LOVE anything to do with buttons, but this is so perfect with glitter on them!! who'lda thunk?!
ReplyDeleteAnother great project Sarah.
ReplyDeleteI'd love it if you could share this over on my Simply Christmas Inspiration Party at http://shabbyartboutique.blogspot.com/2011/11/inspiration-friday.html
This looks so wonderful and what a clever way to display it with the frame.
ReplyDeleteGosh I have done the button ornaments and never thought about adding glitter to them. I love it done with the glitter.
ReplyDeleteKaran
Really cool. Thank you for sharing and for linking up to last weeks show and share party. Please come back this week and share your latest project with us.
ReplyDeleteA mommy's life...with a touch of yellow
Tyandwhitneyulrich.blogspot.com
Another simple craft that makes a fun decor project! And if there's one thing I have an abundance of...it's buttons! ;)
ReplyDeleteThanks for joining Time Travel Thursday, Sarah.
Blessings,
Liz @ The Brambleberry Cottage
http://thebrambleberrycottage.blogspot.com/
Great ornament!! Thanks for sharing at Shine on Friday!
ReplyDeleteThis is so pretty. I love buttons! Thank you for sharing it at Fabulous Friday.
ReplyDeleteWarmly, Michelle
What a neat idea! It's beautiful :)
ReplyDelete